Individual Player Settings 
Section titled “Individual Player Settings ”Individual Player Settings are usually quite extensive. The typical headings of the various sections are shown in the following image and subsections below will expand on them. Some items are hidden unless the Show advanced settings toggle is on. Groups have the same sections but less settings available. Not all players have all the settings listed. Reference can be made to the Player Summary Table to identify some of the functionality that should be available for a given player type otherwise visit the settings page for the player.
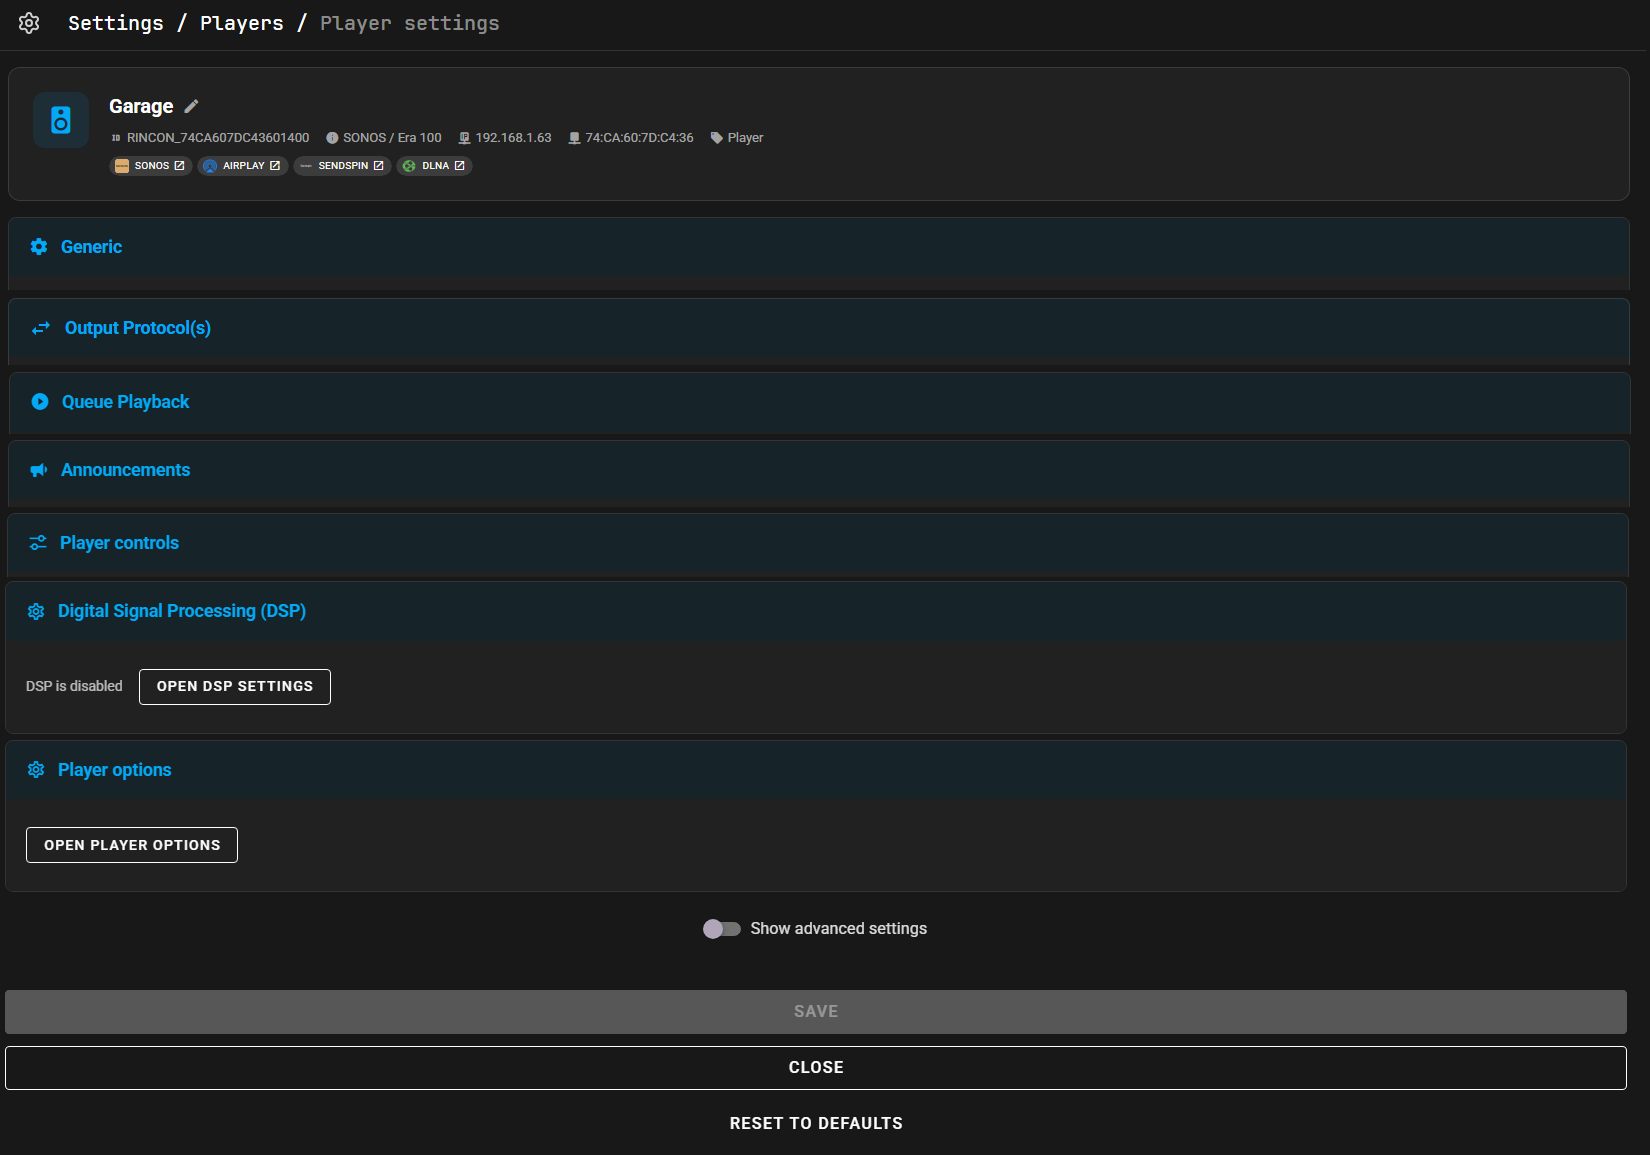
A powerful feature of Music Assistant is that it will combine all of the available protocols from a device into one player. The available protocols can be seen in the chips at the top of the page and in the Output Protocols section of the settings.
Generic Settings
Section titled “Generic Settings”- Hide this player in the UI. This setting determines when the player will not be shown in the Player List and other areas of the UI
- Expose this player to Home Assistant. If disabled the player will not be imported into HA
- Icon. A material design icon is used in some parts of the UI and this can be configured on a per player basis
- Dynamic members toggle. This setting is available for Sync and Universal Groups. When enabled, it is then possible to add and remove members from these group types
- Group members. For Group player types the members of the group are configured in this field
Output Protocols
Section titled “Output Protocols”- Preferred Output Protocol. Choose from the list of available protocols
Each available protocol then has its own configuration section. Protocols can be disabled except for the native protocol of the device. Refer to the relevant Player provider for settings which are available for each
Queue Playback
Section titled “Queue Playback”- Enable Smart Fades. This dropdown enables the crossfade transition functionality between tracks. The crossfade duration is set by the slider below. The options available are
Disabled [Default],Smart FadesorStandard Crossfade. Smart Fades automatically analyzes each track’s tempo and beats to create seamless, musically aligned transitions between songs. It adjusts BPM, aligns downbeats, and applies EQ-based mixing for smoother fades—falling back to standard crossfade if analysis fails. Standard crossfade smoothly overlaps the end of one song with the start of the next using a simple volume fade. - Fallback Crossfade duration. This slider is enabled when crossfade is enabled in the Audio section. The default setting is 8 seconds
- Enable Volume Normalization. This setting should normally remain enabled to avoid differing volume levels between tracks from different sources. Read more about this on the Technical Information page. The target level is set in the Advanced Settings
- Enable Limiting to Prevent Clipping. This setting should normally remain enabled to prevent audio distortion by excessively loud peaks in a track
- Target level for Volume Normalization. The default setting of -17 should normally be left undisturbed. If this is set too high it may cause clipping. Volume Normalization is enabled and disabled in the Audio section
Announcements Configuration
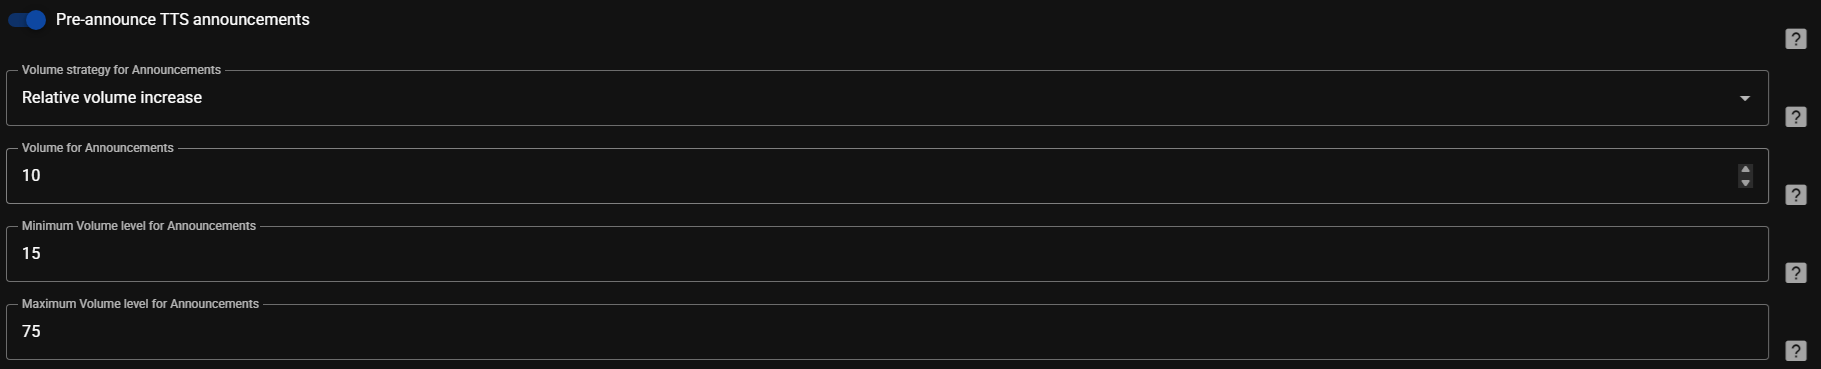
Section titled “Announcements Configuration”There are a number of configurable options for controlling the volume of announcements sent to the MA players. These are well described by the help available by selecting this icon ![]() beside each field. The
beside each field. The Maximum and Minimum Volume level boxes do not apply when the Absolute volume option is selected.
Player Controls
Section titled “Player Controls”Each player has a number of options available to control the behaviour of the power, volume and mute controls in the MA UI. By default, if a device supports these controls then that native behaviour will be used or if the control is not supported then it will be disabled in the UI (the setting will indicate NONE). It is also possible to manually disable the controls by changing the setting to NONE. Some of the options require the advanced toggle to be enabled before they can be seen.
It is possible to map other HA entities to the MA player controls. in order for this to be an option the HA entities need to be first exposed to MA via the settings in the HA Plugin.
Power If a player does not support power but it is desired that the player has an on and off state then a FAKE option is available which will simulate the on/off functionality.
Volume This allows the volume control to be defined or disabled.
Mute There is a FAKE option that will set the volume to zero and restore it when mute and unmute is commanded.
Minimum and Maximum Volume Two sliders allow the application of limits to the maximum and minimum values that are sent to the player. The volume sliders in the UI are rescaled so the full 0-100 range will still be seen.
Auomatically play/resume on power on If the player supports power control then this option will cause the player to immediately start playing any items in the queue on power on.
DSP Settings
Section titled “DSP Settings”All providers have the option to apply Digital Signal Processing (DSP) filters to the audio stream. DSP lets you shape and refine the audio with a variety of filters. Use it to tailor the sound to a room’s acoustics, compensate for speaker characteristics, and fine-tune the frequency balance to personal taste.
The DSP option is found in the MA settings for each player which means that each player has its own independently configurable DSP settings.
When playing in a group, individual player DSP settings will only be used for Universal groups and when playing via AirPlay, Squeezelite or Sendspin. Groups using all other protocols will have DSP disabled.
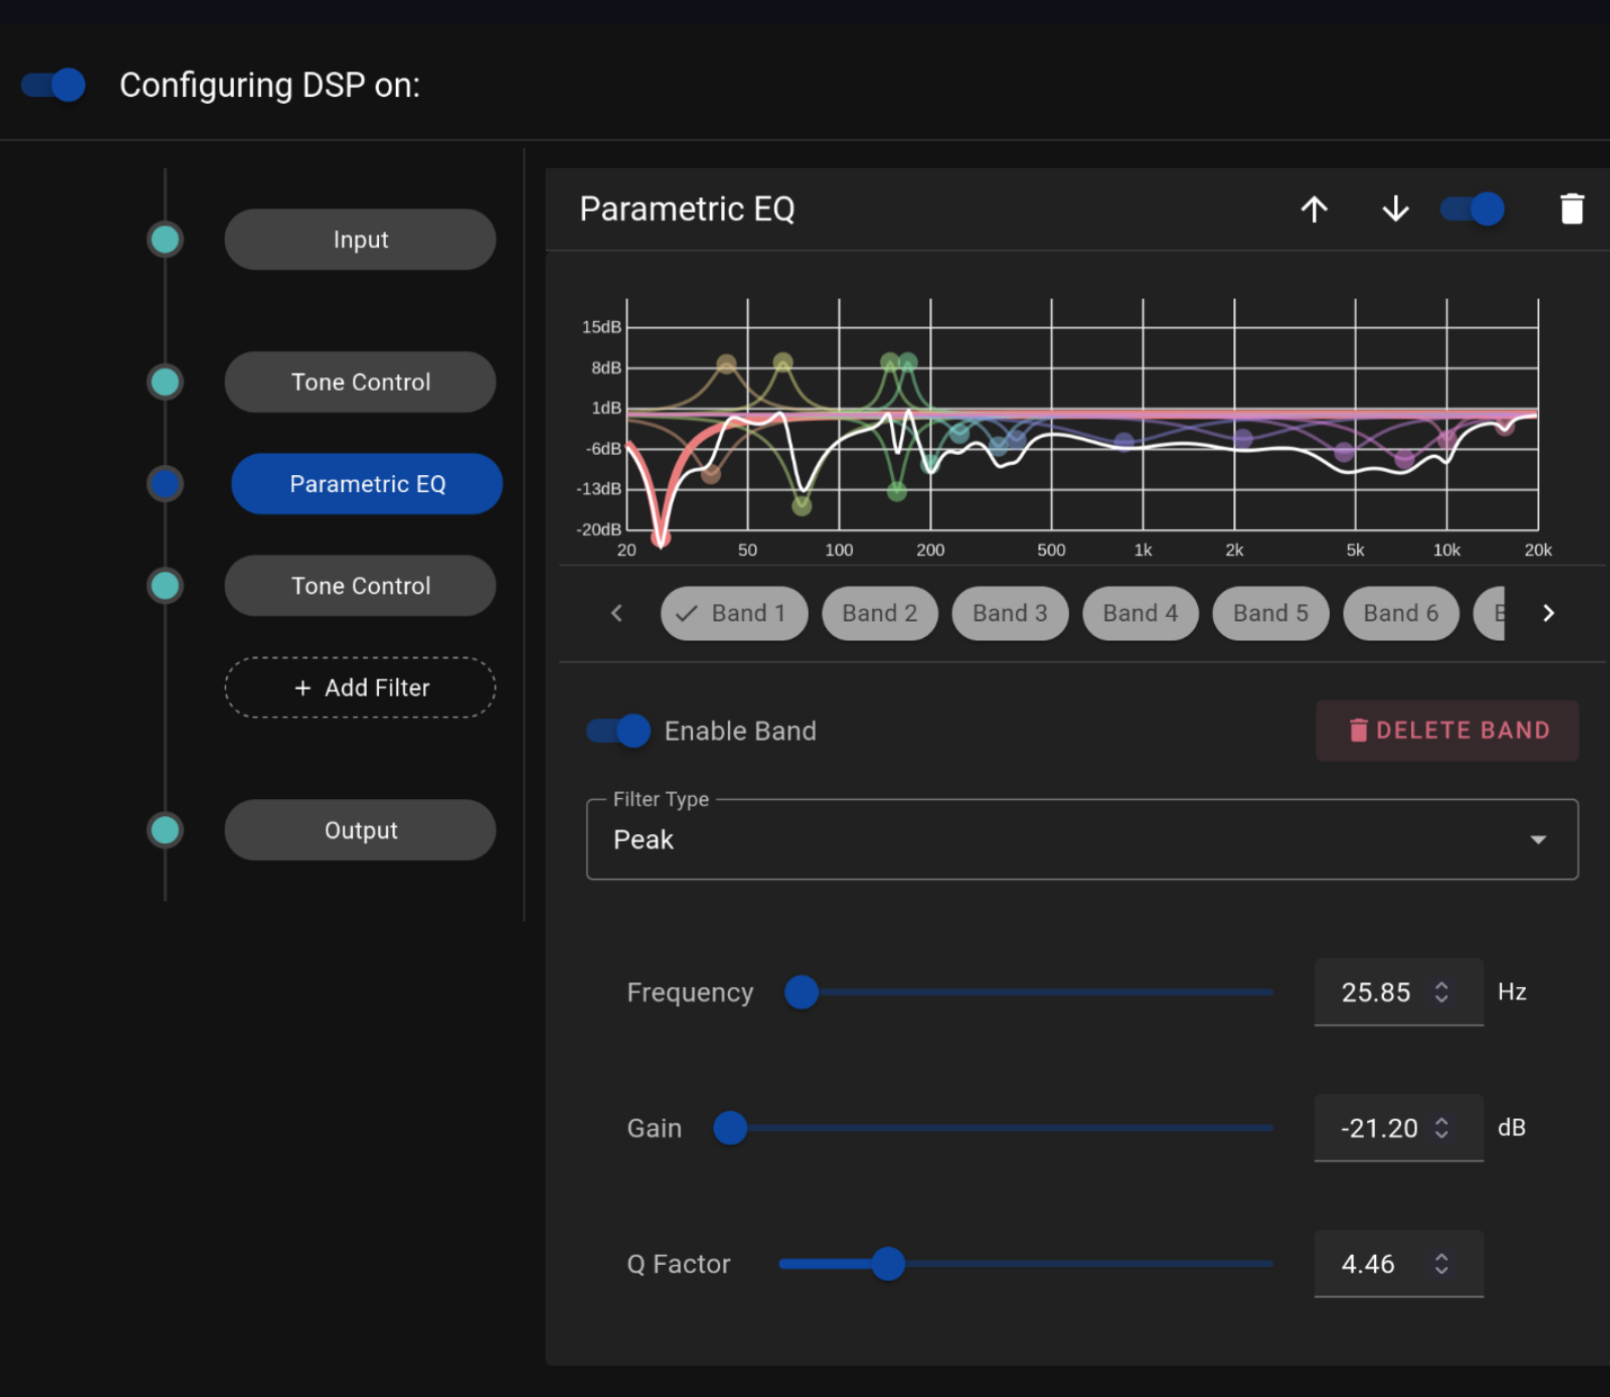
The DSP path consists of an INPUT pre-amplifier for initial gain control, followed by optional audio filters that can be added between input and output (multiple times if desired). The following filters are available:
The path ends with an OUTPUT stage that provides both gain control and a limiter (enabled by default) to prevent signal clipping.
The DSP settings can be enabled and disabled via a toggle which allows easy A-B testing
The line on the left of the DSP settings represents the audio path, in sequential order, from the audio file (top) to the player (bottom).
A dot on the line represents a component that changes the signal. The lack of a dot indicates that the particular component has been disabled.
Using the icons at the top of the view, the additional filters can be reordered, disabled/enabled or deleted.
Player Options
Section titled “Player Options”Some players (e.g. MusicCast have unique control features which are fully described in the documentation for the relevant player provider